Documentation
Table of Contents
Getting Started
-
Register a new congregation in Territory Bro.
- If somebody has already registered your congregation to Territory Bro, they can give you access to it if you:
- Visit the Join an existing congregation page to find out your User ID code (it's made of 36 random numbers, letters and dashes).
- Send the User ID to the person who already can access your congregation in Territory Bro.
- They will need to visit the congregation's settings page in Territory Bro, and add you there using your User ID.
- If somebody has already registered your congregation to Territory Bro, they can give you access to it if you:
-
After registering the congregation, in the congregation's Settings page there is a button to download a QGIS project file. Save the project file on your computer.
-
Download and install the latest QGIS 3.x LTR (Long Term Release). This program will be used to edit the territory maps.
-
Use QGIS to open your congregation's QGIS project file (from step 2). You should see a world map, and you can zoom to your city.
- If you can't see the map, it could be because the map is zoomed into a sea. Zoom all the way out using the View | Zoom Full action from the application menus.
After this, the next steps are to draw your congregation's boundaries and individual territories.
Basic Concepts
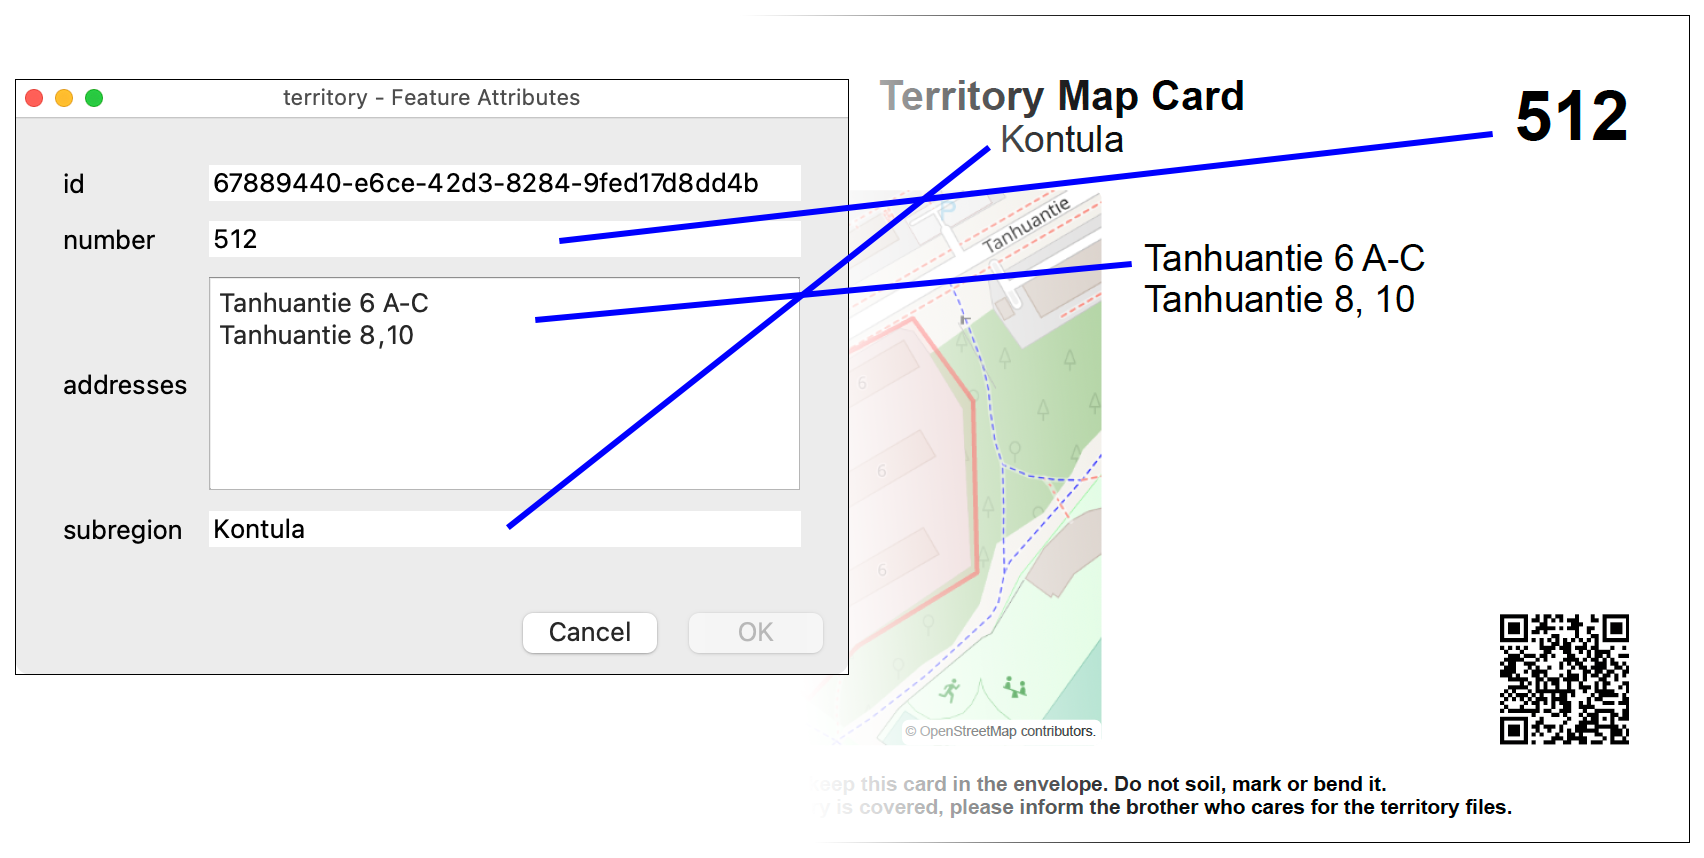
Consider the following territory card. This chapter will explain how the elements on that card map to elements in QGIS.
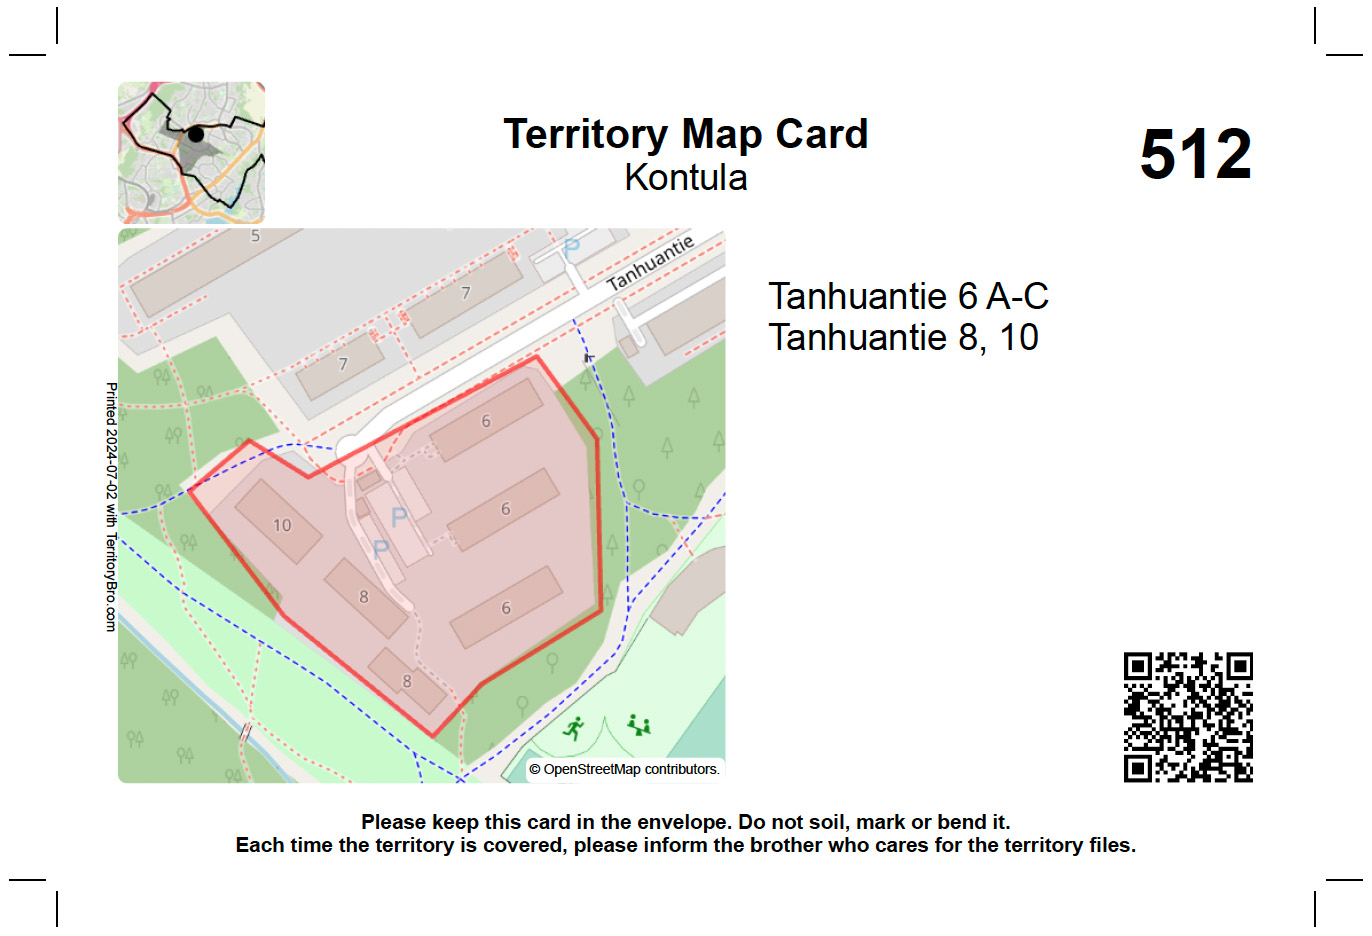
Right in the middle is the territory's map. Each territory can be seen in QGIS as a "feature" on the territory "layer". With QGIS, you can draw the territory as a polygon, and then write some "attributes" for the feature. The territory layer's feature attributes correspond to these elements of the territory card:
Next, let's consider the minimap in the top left corner, since it demonstrates every layer in QGIS:
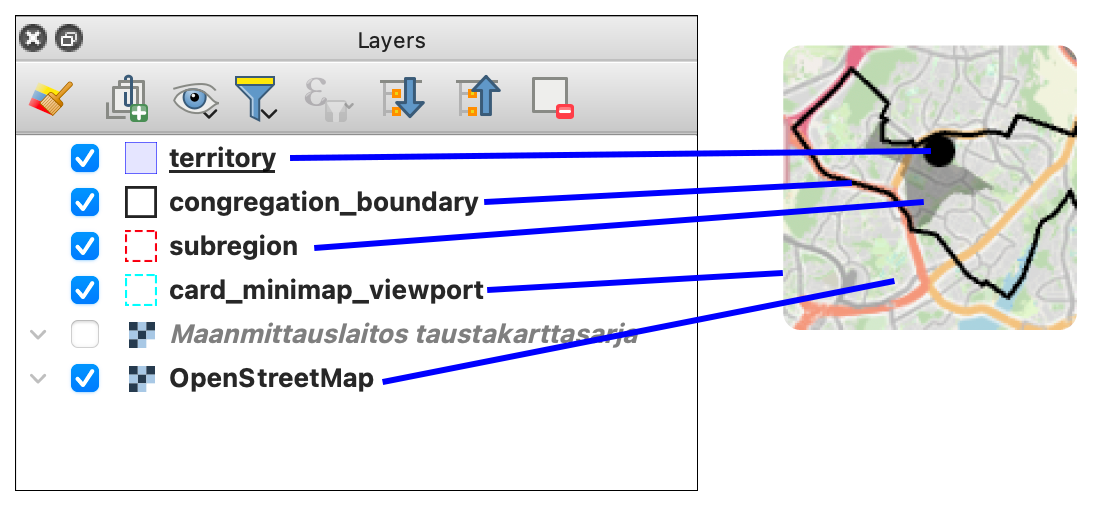
The territory layer we've already mentioned. The territory's location is shown in the minimap as a black circle.
The congregation_boundary layer is for marking the whole area which is the congregation's responsibility. It is shown in the minimap as a black line.
The subregion layer is optional. It can be used to mark city districts or postal code areas, if it makes easier to organize your territories. The current territory's region is shown in the minimap as a darkened area.
The card_minimap_viewport layer is optional. It can be used to crop the minimap. The above example card's congregation boundary extends far to the east, to the countryside, but the minimap will be easier to see if it's limited to just the city for city territories. That can be done by adding to the card_minimap_viewport layer a polygon feature which covers just the city portion, and another polygon feature which covers the countryside.
Only the congregation_boundary and territory layers are mandatory. The other layers can be left empty.
Last in the layers panel are various background maps. The default is OpenStreetMap, which has street maps for the whole world, but for some countries there are additional maps. These same maps can be used for printing the territory cards inside Territory Bro.
Editing the Maps
In QGIS, to draw a feature on one of the layers, first select the layer in the Layers panel (View | Panels | Layers) and choose Layer | Toggle Editing from the application menus.
Now the layer is editable, and you can choose the Edit | Add Polygon Feature tool. Left-click on the map to draw the polygon's corners. Right-click when you're finished, after which you can type the feature's attributes.
The feature is saved to the database only after you select Layer | Save Layer Edits. To avoid losing work, it's best to save after each new territory you add, in case QGIS crashes and you need to restart QGIS (it is known to happen).
After you are done editing a layer, you can choose Layer | Toggle Editing again to make the layer read-only. (If there is a problem saving the data, you can typically recover by toggling the editing off and back on, and choosing to discard all unsaved changes.)
View the following videos to see an example and to learn more.
How to Create Congregation Boundaries
How to Create and Edit Territories
How to Import City District Boundaries (optional)
Printing Territory Cards
Go to your congregation's Printouts page. You should see your territories ready to be printed using various card
templates. You can print multiple territories at once by holding down Ctrl or Shift to select them from the
territory list.
By default, the background maps from OpenStreetMap are used, but Territory Bro can support also other freely available maps. Create an issue if you know about a map you wish to use. (Note that due to license restrictions, Google Maps cannot be added there.)
You can do minor adjustments to the maps: drag with mouse to move, scroll mouse wheel to zoom, hold Alt+Shift while
dragging to rotate. These adjustments are lost after you leave the page, so do them right before printing the cards.
Do a test print with one page, and check if the territory cards come out the right size. You might need to adjust the print scale in your web browser's or printer's settings. (If your web browser doesn't allow specifying the scale with an exact percentage, you can first save the page as a PDF, and then print the PDF using Adobe Reader.) Print one page with 100% scale on paper (one A4 sheet fits 2 cards) and measure the distance between the printed crop marks. Then measure that what the dimensions of the card should really be, so that it would fit inside your protective plastic cases. Calculate the correct scale for printing the cards by dividing those two measures, and try printing again.
Print the territory cards with the correct scale on thick paper. Cut the cards along the crop marks using a ruler and a sharp knife. Optionally cover the cards with adhesive book covering film (best done before cutting them out).
Tips
Importing Map Data from KML/KMZ Files
If you've used Google Maps or Google Earth to store your territory data, you can export them as KML/KMZ files from there, and import them into QGIS. You can import pretty much any map data format to QGIS.
Drag and drop the map data file to QGIS, and QGIS will add it as a new layer. You can then copy the features from that layer and paste them to the territories layer.
To copy also the territory numbers and addresses, the field names must be the same in both layers. Right-click a layer and choose Open Attribute Table to check the names of the fields.
You can't edit a layer backed by a KML/KMZ file in QGIS, so you must make a copy of the layer to be able to rename the fields. Choose Edit | Select | Select All Features to select all features on the layer, copy them with Edit | Copy Features, and paste them to a new layer with Edit | Paste Features As | Temporary Scratch Layer. Now you can enable editing the layer and rename the fields by right-clicking the layer and going to Properties | Fields.
Locating Staircase Entrances
Sometimes it's possible to use OpenStreetMap to find out the staircase entrance letters/numbers easily. On the right side of the map, there is a Query features tool (its icon is a mouse cursor with a question mark). Click the building with that, and it might show the staircase entrance in the nearby features list. You could also use Google Street View. That can be helpful in drawing the territory boundaries, so that you don't always need to visit the places physically.